Facebook Messenger is the key to connecting with billions of people across the world. Integrate it with Kommo to establish a convenient, two-way channel of communication with your customers, and reach them where they communicate the most.
How to integrate Facebook Messenger
Installing the integration is super easy, just follow the steps below to install Messenger successfully.
Please note: Due to Facebook’s policies, only business pages can be connected to third-party softwares (including Kommo). It is not possible to integrate your personal page.
To connect Facebook Messenger to your Kommo account:
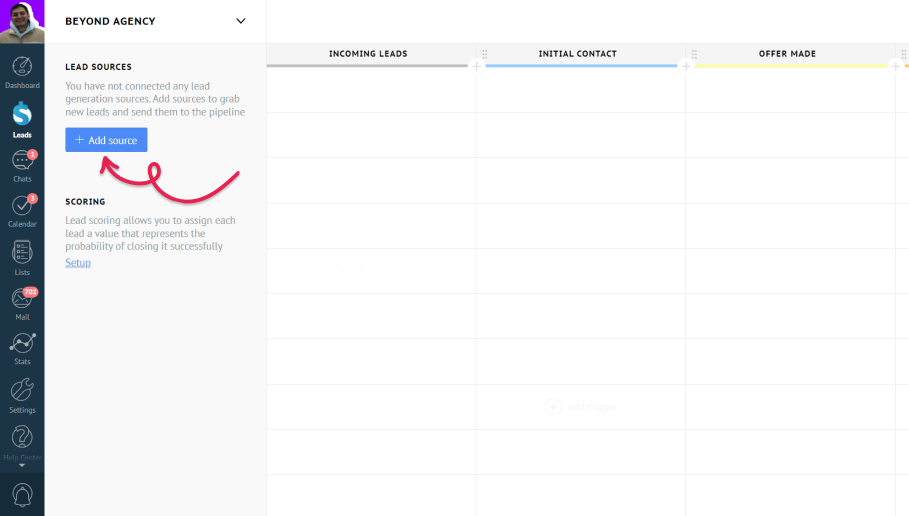
- Go to the Leads section and press the Automate button in the top right corner.
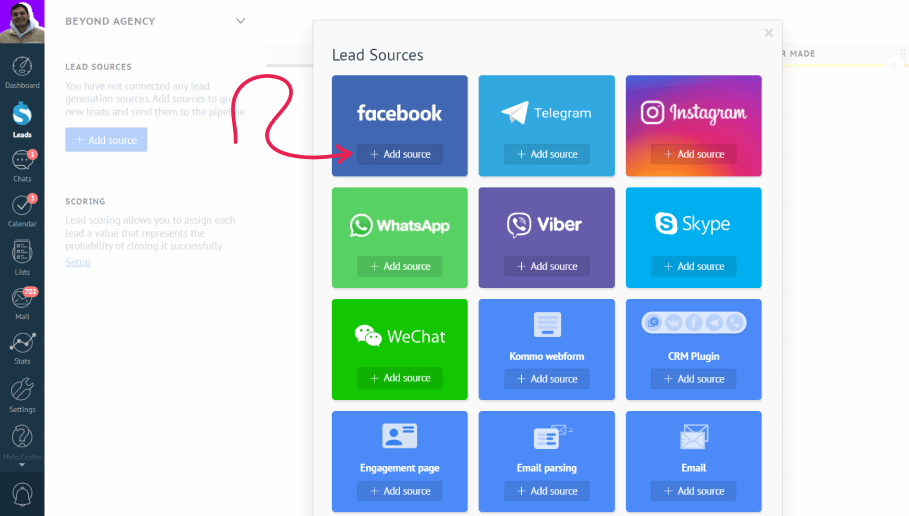
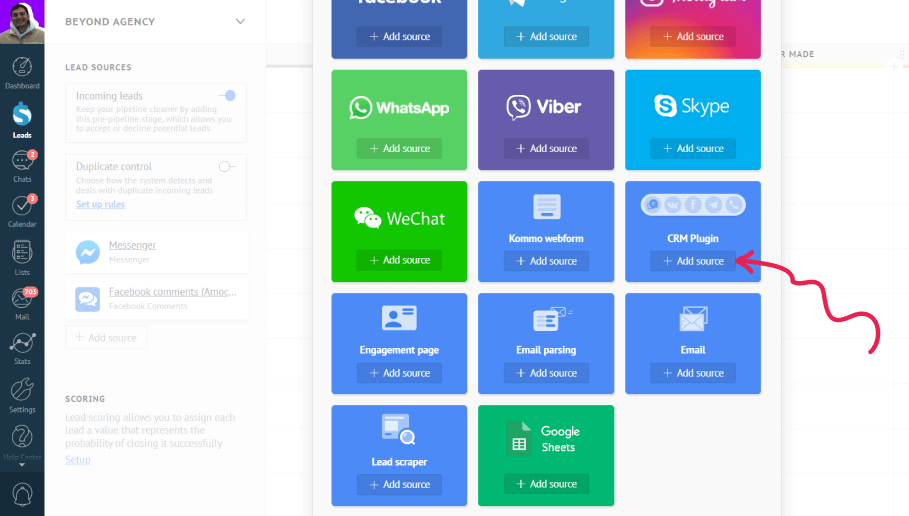
- Under Lead sources, select + Add source button
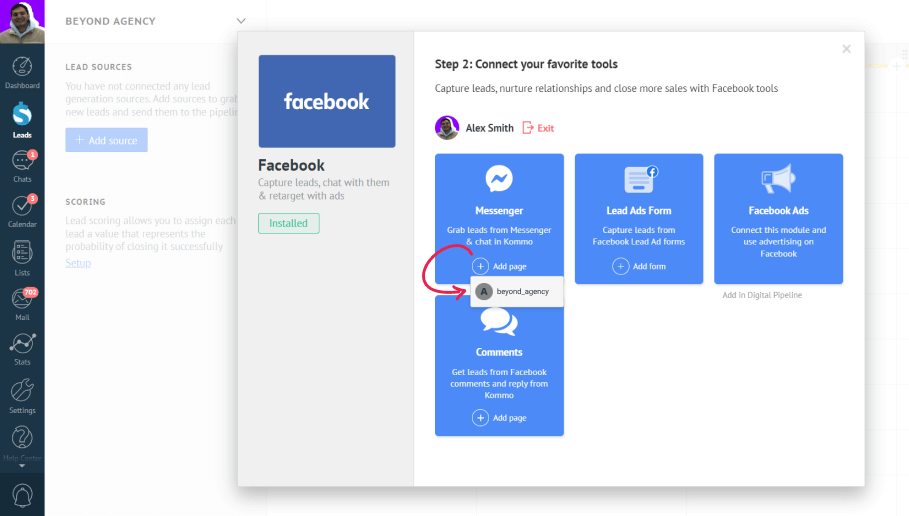
- Select Facebook Messenger and click Add source
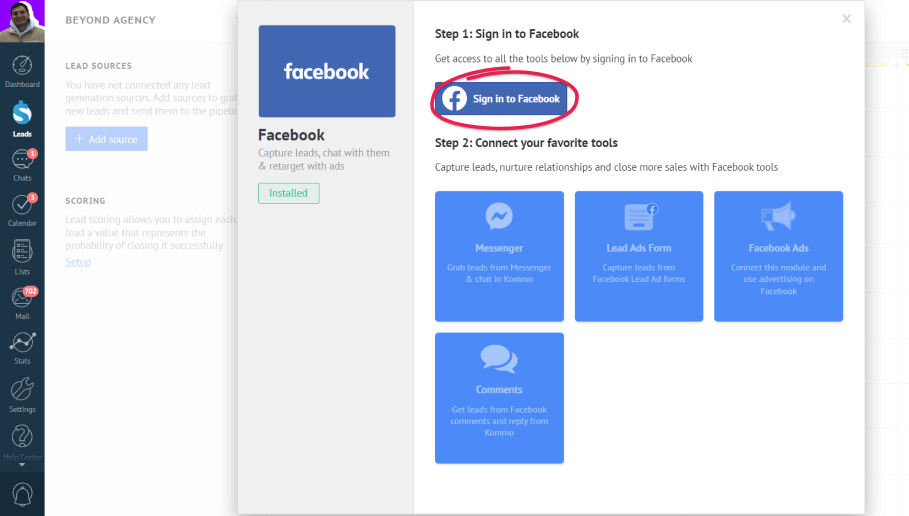
- Click on the login icon and connect your Facebook account.
Important: Your Facebook account must have a primary email set and verified (read our step-by-step instructions).
- Once connected, select the business page you’d like to connect
And that’s it. You’re good to go!
How to connect multiple business pages
Connecting Facebook Messenger (or any messenger) is a unique process for every pipeline. If you have several pipelines, you can connect different business pages to each one of them.
To do this, just switch to your different pipeline, and repeat the process of connecting Facebook as it is explained in the previous section.
Please note: the same business page cannot be used on multiple pipelines.
How to use Facebook Messenger with Kommo
The integration itself allows you to receive messages from your clients that visit either your business page or use the Engagement button on your website.
When someone sends a message to your business page, reacts to your story or leaves a comment under your post, a new chat will appear in your Chats section. There, you can respond to messages straight away use your saved templates and run bots.
Accepting, deleting or linking contacts
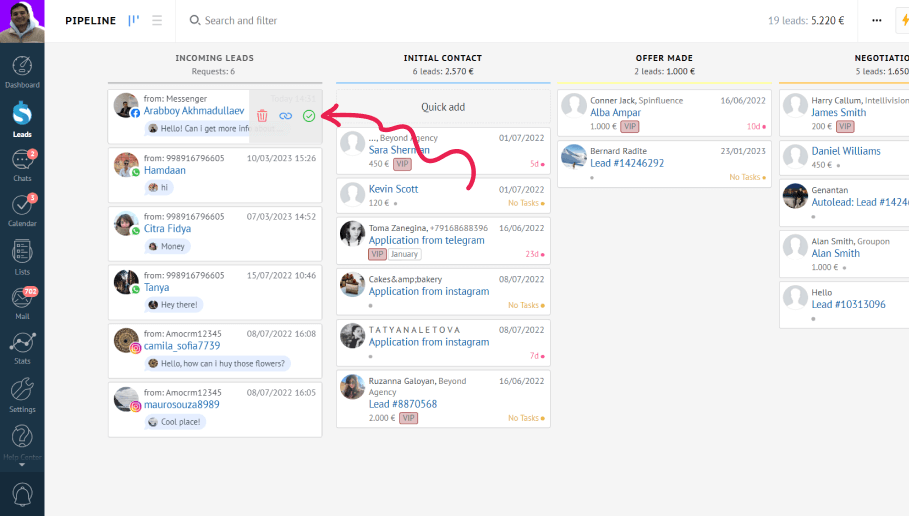
Any new messages you receive will also be visible in the Incoming leads stage of your pipeline, with each sender having their own unique chat. If the message is from your target audience, you can accept it. Otherwise if it’s spam, you can delete it.
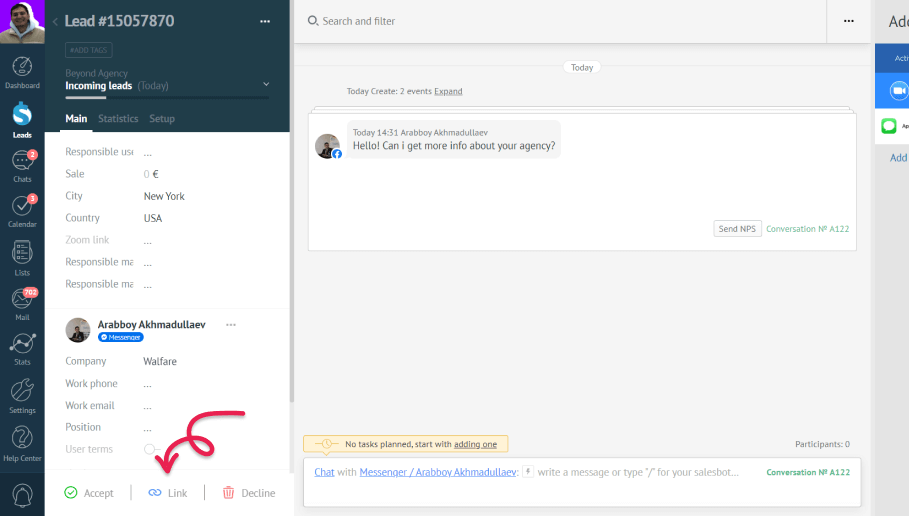
If a contact already exists in the database, you can link the chat to their contact card. Do so by pressing Link and finding the correct contact in the search bar.
Should you decide to accept an incoming lead, it will be transferred to the first stage of your pipeline. If you delete it, the incoming lead will only be recreated with all the chat history if they write to you again. If the same person writes to different connected FB pages, several incoming leads will be created.
To reply back to an incoming lead, open the lead card and type your message in the action box or head over to the Chats section where you can answer all your incoming messages more smoothly.
Please note: Any outgoing messages sent directly via Facebook Messenger or through a FB profile won’t be added to the chat conversation in the lead card. Incoming messages however, will still be synced.
You can also make use of our Broadcasting feature to run mass campaigns. To learn more, read our Broadcasting article.
Using the Salesbot with Facebook Messenger
Looking to enjoy the Salesbot and the time it will save for your team? If so – you’re awesome!
You can easily launch your bots during your conversations. Just go to a Messenger chat that you want to use salesbot in, type the forward slash symbol (/) in the action box and choose one of your previously saved bots. Hit Run to launch the bot.
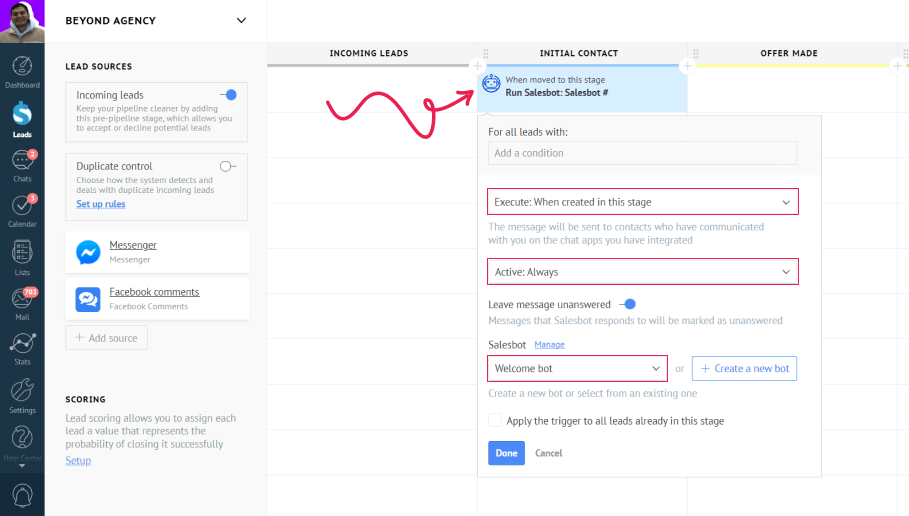
If you want the bot be launched automatically or want to create automations along with other triggers as leads land on your pipeline, then you can do that in the Leads section:
- Go to Leads > Automate
- Click the ‘+’ button on a free spot under a stage that you want your lead work on.
- Choose to add a salesbot
- Select your salesbot and set the trigger rules
For example, you can choose to execute when a new chat is created on this stage, active Always and select the Welcome bot. This way when a new bot is created on this stage, the bot automatically sends a welcome message.
To learn more about creating and setting up salesbots, visit the Salesbot section of our Knowledge Base.
Please note: in case you use third-party integrations (like ManyChat, Chatfuel, etc), only incoming messages will be synchronized. Outgoing chat messages won’t be synchronized due to differences in data types and chatbot actions.
Website chat button with Facebook Messenger
You can also connect Facebook Messenger by using the website chat button. With it, your customers can message you directly from your website.
To install the website chat button, again, proceed to the Leads section and press the Setup button in the top right corner. Then, follow these steps:
- Under Lead sources, select + Add source button
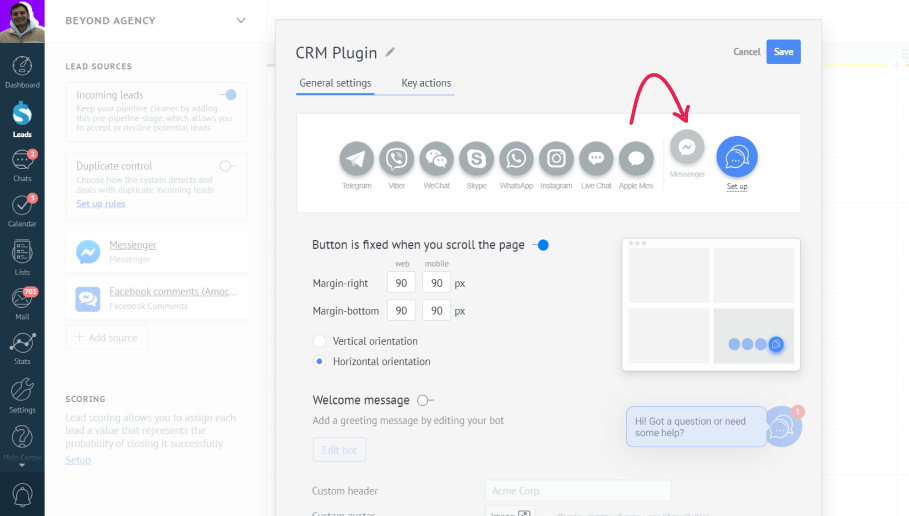
- Select website chat button and press + Add source
- Drag and drop the Facebook Messenger icon to website chat button slot
- Click on the Facebook Messenger icon to select the active business page
Configure the website chat button as you see fit, and then follow the on-page instructions to install it on your website.
Limitations on messaging
Facebook has specific limitations regarding messaging clients who have messaged you more than 24 hours ago. In such cases, you can only message them using a tag.
Currently, the Messenger API for Instagram supports only one tag which is the ‘human_agent’ tag. It will automatically be set in your lead card if your client has not messaged you within the past 1 to 7 days.
Use of tags outside of approved use cases may result in restrictions on your ability to send messages.
Please note: If a client messaged over 7 days ago, then you can’t reply to them.
You can get detailed information about the Facebook/Instagram messaging policy here.
Possible problems/solutions
Here are some tips on how to deal with common problems.
Cannot connect your Facebook account and/or business page?
Please make sure your account meets the following requirements:
- You must be the admin of the business page/group in order to connect it properly.
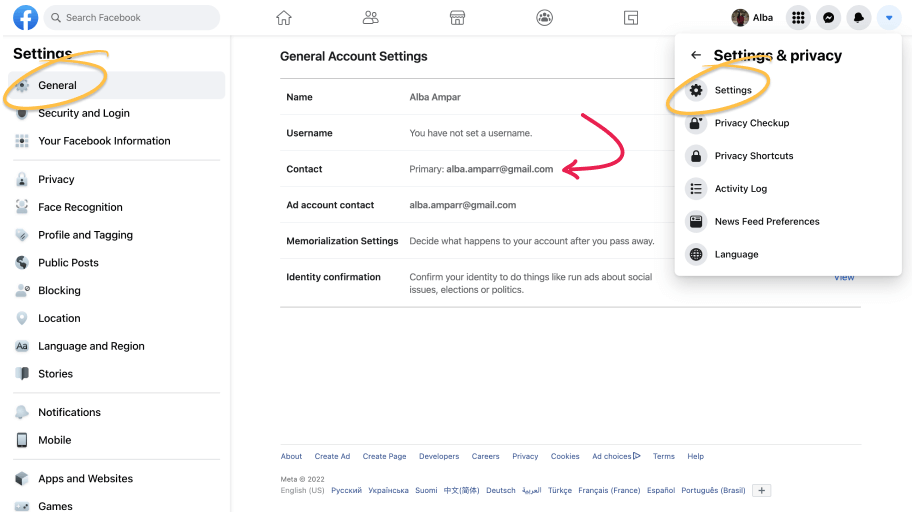
- Your Facebook account must have an associated verified email address and the email address should be chosen as “Primary” in the “Contact” field.
How to add and verify a Facebook email?
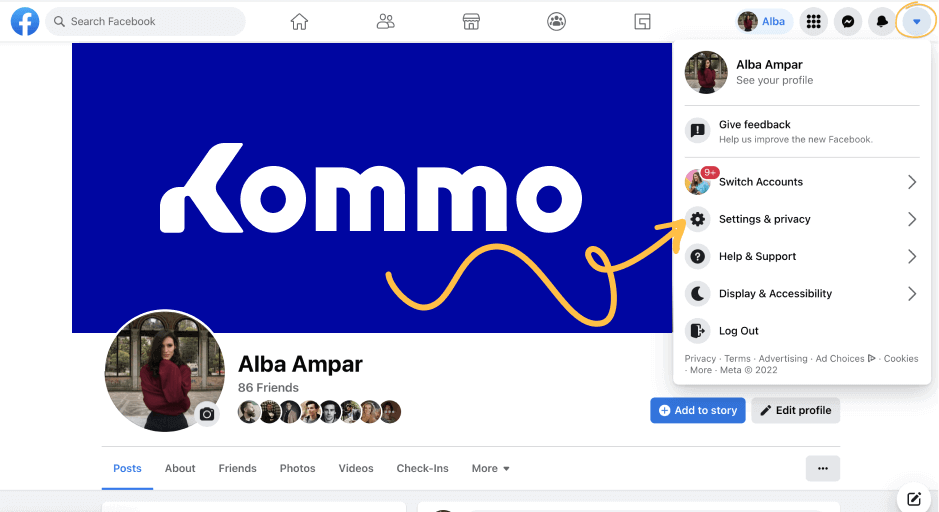
To check that click on the drop-down sign in the right top corner, then click Settings & Privacy -> Settings -> General.
If the “Contact” field has a phone number instead of an email, click on the field to add one.
Do not forget to verify your email once added – Facebook account cannot be connected to Kommo before that.
Can’t send out Stripe payment links?
In order to send Stripe payment links, ensure that the links' domain is added to the whitelist in the Facebook page settings -> Messenger Platform -> Whitelisted Domains.
Can’t connect more than one Facebook account?
You can connect only one Facebook account (and all associated business pages) to a single Kommo account. Your Facebook account will be disconnected if you try to connect it to another Kommo account (although it will connect to a new account successfully).
Can’t send more than one file in the chat?
Please note that you can’t send more than one file in one chat message.
🏆 Related use cases
CRM for Manufacturing – How Cosmichrome manages distributors in 6 markets with Kommo
CRM for Event Planners – How B_Entertained DJs and More increased response speed by 50%
CRM for Wholesale – How Hero Time increased leads in 5 months with MBS
CRM for Realtors – How MC17 increased work efficiency by going online with Kommo
CRM for Marketing – How Kommo generated 5k ebook downloads with Salesbot
Need more help setting up or troubleshooting? Contact us by sending an email to support@kommo.com or write to us on Facebook.
Not a user yet? Visit our tour page or contact us for a demo.
