With the launch of WhatsApp Cloud API, hosted by Meta, WhatsApp opened new business possibilities.
Today, we’ll cover everything you need to know about WhatsApp Cloud API, how it differs from the WhatsApp On-Premise API, and how to set it up.
What is WhatsApp Cloud API?
The WhatsApp Cloud API enables medium and large businesses to interact with customers using Meta’s cloud-hosted version. WhatsApp Cloud API offers many features that empower businesses to connect and engage with customers.
You can integrate the API with different backend systems, including marketing platforms or CRMs.
Meta emphasizes the following:
“In general, we recommend that the majority of businesses use the Cloud API due to ease of implementation and maintenance.”
Meta doesn’t provide a platform for direct customer interaction with the WhatsApp Cloud API. To send and receive messages, you need to connect them to a BSP or customer conversation management software (CCM) like Kommo.
Alternatively, you can develop your own app to bypass third-party services.
If you're seeking a reliable and powerful WhatsApp Cloud API provider, Kommo may be the one.
Kommo is the world's first WhatsApp CRM and an officially badged Meta Business Partner, indicating that Kommo's expertise has been verified and recognized by Meta. 🤝
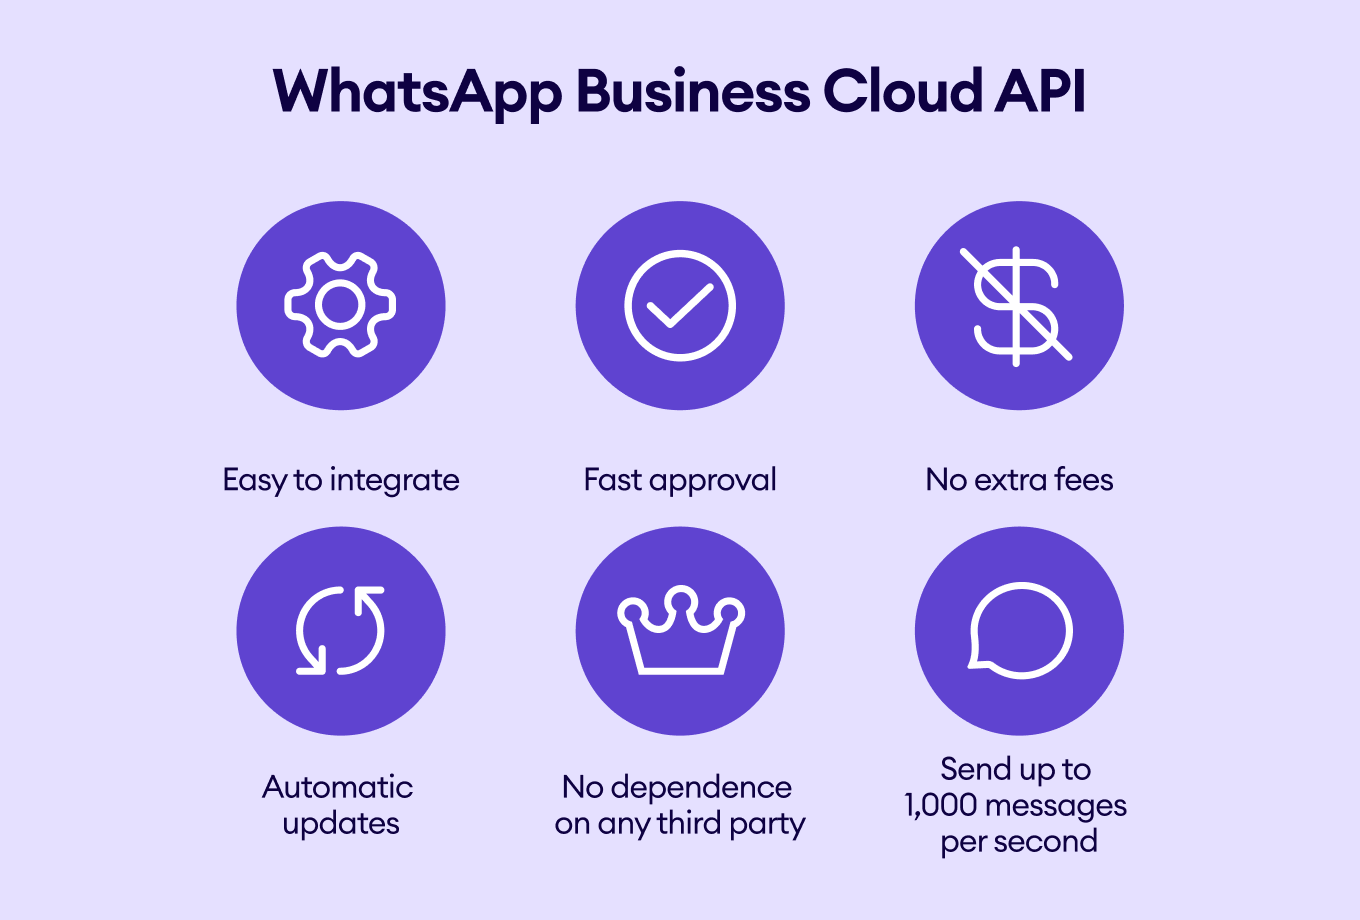
WhatsApp Cloud API benefits
Now, let’s look at the benefits of WhatsApp Cloud API 👇
The functionality of your WhatsApp Cloud API may vary based on the chosen BSP or CMM, but the core features of the WhatsApp Cloud API remain consistent across solution providers.
WhatsApp Cloud API features
WhatsApp Cloud API integration features
There are a number of features that the WhatsApp Cloud API + Kommo integration offers. Let’s take a look at them.
1. Automation 🤖
Kommo offers various automation features, such as:
-
Integration in lead profiles: Effortlessly incorporate WhatsApp communication into their client’s lead profiles.
-
Digital Pipeline compatibility: Seamlessly connect WhatsApp Cloud API with their Digital Pipeline for streamlined sales processes.
-
Chatbots: Enhance their sales strategy by integrating Salesbot for automated interactions.
-
Broadcasts: Reach out to multiple customers simultaneously with broadcast messages.
2. Versatile messaging capabilities ✨
Businesses can now offer their clients a variety of options for sending messages:
-
Text messages: Communicating through traditional text messages.
-
Media sharing: Sharing photos, videos, and documents with ease.
-
Templates: Sending CRM templates and pre-approved WhatsApp templates.
-
Interactive messages: Sending messages with quick reply buttons and list messages.
-
Stickers and reactions: Expressing themselves with stickers and reactions for added engagement.
-
Voice and audio messages: Sending voice messages for a more personal touch.
-
Replies: See which messages clients are referring to.
When receiving messages from clients, users can include:
-
Text messages: Communicating through traditional text messages.
-
Media sharing: Sharing photos, videos, and documents with ease.
-
Location sharing: Easily sharing locations with customers when needed.
-
Contact sharing: Exchanging contact information within chats.
-
Stickers and reactions: Expressing themselves with stickers and reactions for added engagement.
-
Voice and audio messages: Sending voice messages for a more personal touch.
-
Replies: See which messages clients are referring to.
3. Flexible message formats ⚙️
Businesses can tailor messages to suit their needs with various formats, including:
-
Templates: Use pre-defined message templates for consistent and efficient communication.
-
Free-form messages: Craft custom messages tailored to individual clients.
-
Interactive messages: Incorporate interactive buttons to prompt user engagement.
-
List messages: Present information in a structured list format for clarity and ease of reference.
4. Comprehensive message tracking 🔍
Businesses can keep track of message statuses to ensure effective communication, including:
-
Message status updates: Monitor message statuses, including sent, delivered, read, and error notifications.
-
Pipeline and source name customization: Users can personalize their message pipeline and source names for better organization.
-
Multi-number connectivity: Connect and manage multiple phone numbers seamlessly within the platform.
5. Enhanced monitoring and notifications 📊
Users can receive timely notifications and track key metrics to optimize their business strategy, including:
-
24-hour countdown timer : See how much time remains to message clients within the initial 24-hour window, directly in the lead card.
-
Message statistics: Track metrics on message usage and debited amounts per day.
-
Notification center alerts: Users can stay informed about their account status, including low balance, approved templates, and changes in messaging limits.
Once set up, you can start sending broadcasts and interactive messages. You can also utilize advanced automation tools like chatbots and WhatsApp templates to maximize the effectiveness of your marketing, support, and sales teams.
💡 Get all the latest information on WhatsApp Templates and how to easily get approved by Meta
WhatsApp Cloud API Pricing: Is it Free?
As we’ve just covered, by eliminating the BSP fees associated with hosting, WhatsApp Cloud API has made customer interactions smoother and more cost-effective.
Your WhatsApp Cloud API fees will depend on the type of access you need.
If you don’t have the technical resources to set up WhatsApp Cloud API, you can opt for a BSP. like Kommo. Businesses will only have to pay conversation-based fees that are charged directly to their Meta WhatsApp Business account without any intermediaries.
This is also the same if you choose to get WhatsApp API directly from Meta, you only need to pay WhatsApp conversation charges. (But in this case, you need to have a team of WhatsApp developers who can integrate it).
WhatsApp conversation charges will be based on the volume and type of conversations between you and your customers. There are two main types of WhatsApp conversations:
- User-initiated (also known as Service Conversations)
- Business-initiated
Differences between WhatsApp Cloud API and On-Premise API
If you’ve been using WhatsApp Business API, now you’re wondering what is the difference.
Let’s compare the WhatsApp Cloud API with WhatsApp On-Premise API.
Key differences
WhatsApp On-Premise API
WhatsApp Cloud API
Front-end interface
No
No
Hosting
You must host the API software on your own servers or data centers
Meta hosts the API for you
Access
Your own server or third-party providers (costs money)
Through Meta
Upgrade
You manage software upgrades regularly yourself
Meta handles the API software upgrades
Privacy
End-to-end encryption by your Business Service Provider
End-to-end encryption by Meta
Set up time
More setup time
Less setup time
Costs
You pay for server setup, maintenance, and per message sent or per conversation
Meta covers hosting costs. You only pay per message or conversation
API Maintenance
Manual updates by the Business Service Provider
Automatic updates by Meta
Technical requirements
Suitable for specific technical needs
Easy implementation
API Protocol
Uses REST API
Uses Graph API
Throughput (Messages Per Second)
Send up to 70 text messages per second for single-connect. Send up to 250 text messages per second for multi-connect. Sending media messages may reduce these numbers
Supports up to 80 messages per second by default.Supports 1,000 messages per second by request. In high system loads, a business may experience reduced message throughput
Media
Hosts media on your Business Service Provider
You can upload media to Cloud API
Server Location
Dependent on your Business Service Provider
Located in North America and the EU
Support
Available 24/7 for critical issues
Available 24/7 for critical issues, until the problem is solved
Source
The key difference between the WhatsApp Cloud API and On-Premises API is the hosting infrastructure – cloud-based versus self-managed. This choice directly impacts two things:
- Simplicity of the integration for businesses
- Speed of updates
Difference between WhatsApp On-Premise API & WhatsApp Cloud API
As shown above, businesses can rely on Business Solutions Providers (BSPs) like Kommo or Twilio to obtain WhatsApp for Business API approval to access the On-Premise API. Partnering with a BSP provides a ready-made front-end interface for messaging. In such cases, Meta doesn’t provide direct access to Cloud API.
With the WhatsApp Cloud API, on the other hand, you can bypass the need for such BSPs and obtain instant API approval and access directly from Meta at no cost (except for messaging fees). This is useful if you already have an in-house team of developers, which means you can save on costs.
If you opt for the Cloud API, Meta will handle all backend hosting and maintenance. This allows your business to access the latest WhatsApp features and updates at no additional cost. You no longer need to wait for features to trickle through third parties or spend time implementing updates yourself.
Limitation
Llimitation is that if you already use WhatsApp for Business API, you cannot simultaneously use the same phone number with WhatsApp Cloud API.
While you can transfer the number to the Cloud API, you must choose between one account type or the other.
Note: The business phone number must be registered with Cloud API. If the number is registered with On-Premises API, it must be migrated to Cloud API first. You cannot use On-Premise API and Cloud API with the same phone number.
Getting started with WhatsApp Cloud API
As we’ve already discussed, there are two ways in which you can get access to WhatsApp Cloud API:
-
Direct Meta Connection: Requires an endpoint server and app development for messaging capabilities. More do-it-yourself approach.
-
BSP WhatsApp Integration: Hassle-free infrastructure hosting and messaging application tools provided by the third-party BSP. Plug-and-play solution.
The main difference is that direct integration requires a more technical setup. You must host your WhatsApp Business API endpoint server and develop an application to facilitate message sending and receipt
Integrating through a BSP takes a more streamlined route. BSPs host all necessary infrastructure and provide tools for building conversational messaging features into your application.
Let’s go through each process one after the other
Accessing WhatsApp Cloud API through Meta
As mentioned earlier, accessing your WhatsApp Cloud API directly through Meta offers a do-it-yourself approach, but we have broken it down to make the process easier for you.
Let’s get to it 👇
Set up Meta’s Developer account and a Meta Developer App.
As with all APIs, you must first create a Developer’s app. To do that:
Sign up or Log in to your Facebook and create a Meta for Developers account by clicking Get Started if you don’t have one yet.
Fill in your Contact Info and About You page. Click the Complete Registration button.
Now, click Create an App.
Select Other from the options below and press Next.
Please note: You must adhere to WhatsApp’s Commerce Policy while developing your WhatsApp Cloud API solution.
Select Business as the type of app you want to create and click Next.
Add a name for your App to distinguish it from the other apps you have or might create in the feature. Specify a contact email for your app and a Facebook Business Account that will be associated with that. Hit Create App.
💡Note: If you don’t have a Business Account, WhatsApp can create one for you automatically.
Scroll down to find WhatsApp in the list of products and click Set up.
If you’ve already chosen the Business Account for the app, it will be pre-set by default. All you need to do is click Continue.
Once you hit continue, you’ll see a Cloud API Quickstart page that will require you to complete the following steps:
Step 1: Select phone numbers
Step 2: Send messages with the API
Step 3: Configure webhooks to receive messages
Step 4: Learn about API and build your app
Step 5: Add a phone number
Step 6: Add payment method
Let’s go over each of them one by one.
Send a test message
We’ll begin with Selecting phonenumbers and Sending messages with API. To do that, click Start using the API.
Add and verify a number connected to an existing WhatsApp account to send a test message with a test number generated by WhatsApp to ensure a successful API connection.
Click Send Message to send your first test message with a WhatsApp API for business.
Configure a Webhook
Now, if you’ve decided to set up your WhatsApp Cloud API by yourself, it’s time for you to unpack your programming skills or call your developer team. Step 3 and 4 you will need to Configure webhooks to receive messages and Build your app to send them.
To configure a webhook, you can create a custom webhook URL or use services like Glitch or Heroku to help you set up the endpoint.
Once you are done, you can subscribe to the WhatsApp API events that you are interested in and try sending a WhatsApp message to your test account. You should receive a notification with the content of your message.
However, if you are opting for a BSP, you can refer to their guidelines for Webhook configuration, including your Callback URL and Token verification. And you won't have to create the app because you will be using WhatsApp BSPs front-end interface to send and receive WhatsApp messages.
Connect a new phone number
Create a WhatsApp Business Profile and Add your phone number to your Cloud API account.
Remember: Your phone number must NOT be associated with any other WhatsApp account.
Once your number is verified, send another test message using your own WhatsApp API number.
Add a Payment Method
Add a Payment Method to send business-initiated messages to your customers and pay for user-initiated messages once the number surpasses 1,000 conversations.
Note: Once you select your location and currency, it cannot be changed.
Scale conversations
Now that you have this powerful tool, you must get the most out of it!
You can only initiate and scale up conversations using pre-approved message templates from marketing, utility, and authentication categories.
Note: You can only send business-initiated messages to customers who have opted-in to receive your messages.
You’ll have to create a template from one of these categories and submit it to WhatsApp for approval.
You can do it under Account Tools in your WhatsApp Manager or directly from a BSP you use.
And now you are ready to embark on your WhatsApp Cloud API adventure.
Bon voyage - may the API force be with you!
WhatsApp Cloud API Setup Tutorials
If you want to learn more about how to set up WhatsApp Cloud API, here are a few tutorials for you.
Meta’s setup guide to WhatsApp Cloud API 👇:
Pabbly’s setup guide to WhatsApp Cloud API👇:
Programming Makes Sense’s setup guide to WhatsApp Cloud API 👇:
Accessing WhatsApp Cloud API through a BSP
For most brands, leveraging a BSP for Meta Cloud API access offers an easier implementation versus building the technical components from scratch alone. However, no matter which route you take, some of the key elements of setting it up will remain the same.
To integrate Kommo with your WhatsApp Cloud API, you first have to open a Kommo account.
Next, go to Settings > Integrations to gain access to Kommo’s marketplace. Here, you see the WhatsApp Cloud API widget. Then click install.
After the integration installation press “Continue with FB” button and log in to your Facebook account. You will see “Connect your account to Kommo” screen, click the “Get started” button to start connection.
Next, you’d follow these steps to connect your WhatsApp Number
Step 1
Fill in your business information: Choose existing Meta business account or create a new one and click the “Next” button.
Step 2
Create or select your WhatsApp Business account: Choose existing WhatsApp Business account or create a new one and click the “Next” button.
Step 3
Create a WhatsApp Business profile: Fill in all necessary fields and click the “Next” button.
Step 4
Add a phone number for WhatsApp: Fill in a phone number, choose the verification method and click the “Next” button.
Step 5
Verify your phone number: Fill in a verification code and click the “Next” button, and then the “Finish” button.
When you have done all these, the number will appear in the selector. Click the “Connect this account” button in order to connect the number to the integration.
And voila, the number will appear in the table
If you’re using the WhatsApp On-Premise API
If you're already using the WhatsApp On-Premise API, there are two things you can do:
- Keep using WhatsApp On-Premises API
- Migrate your account to the WhatsApp Cloud API
Migrating to the WhatsApp Cloud API will likely require a few changes for your business. The transition can be seamless, whether directly with Meta or through your existing BSP if they support the Cloud API hosting model.
All you need to do is:
- Integrate Cloud API
- Backup content of your On-Premises account
- Disable Two-step verification is applicable
-
Make a POST call to the PHONE_NUMBER_ID/register endpoint
- Re-upload media files and make sure nothing is missing
- Start messaging
Alternatively, you can ask your BSP to help you switch to WhatsApp Cloud API.
Note: Any data, including messages and media, received on the On-Premises API deployment before migration will not be accessible in the Cloud API after migration.
When it comes to your customers, the only noticeable difference they may encounter after changing the hosting type is a new system message in your WhatsApp chat. Apart from this minor update, their experience and interaction with your Business on API WhatsApp will remain unchanged.
If you are using WhatsApp Business API
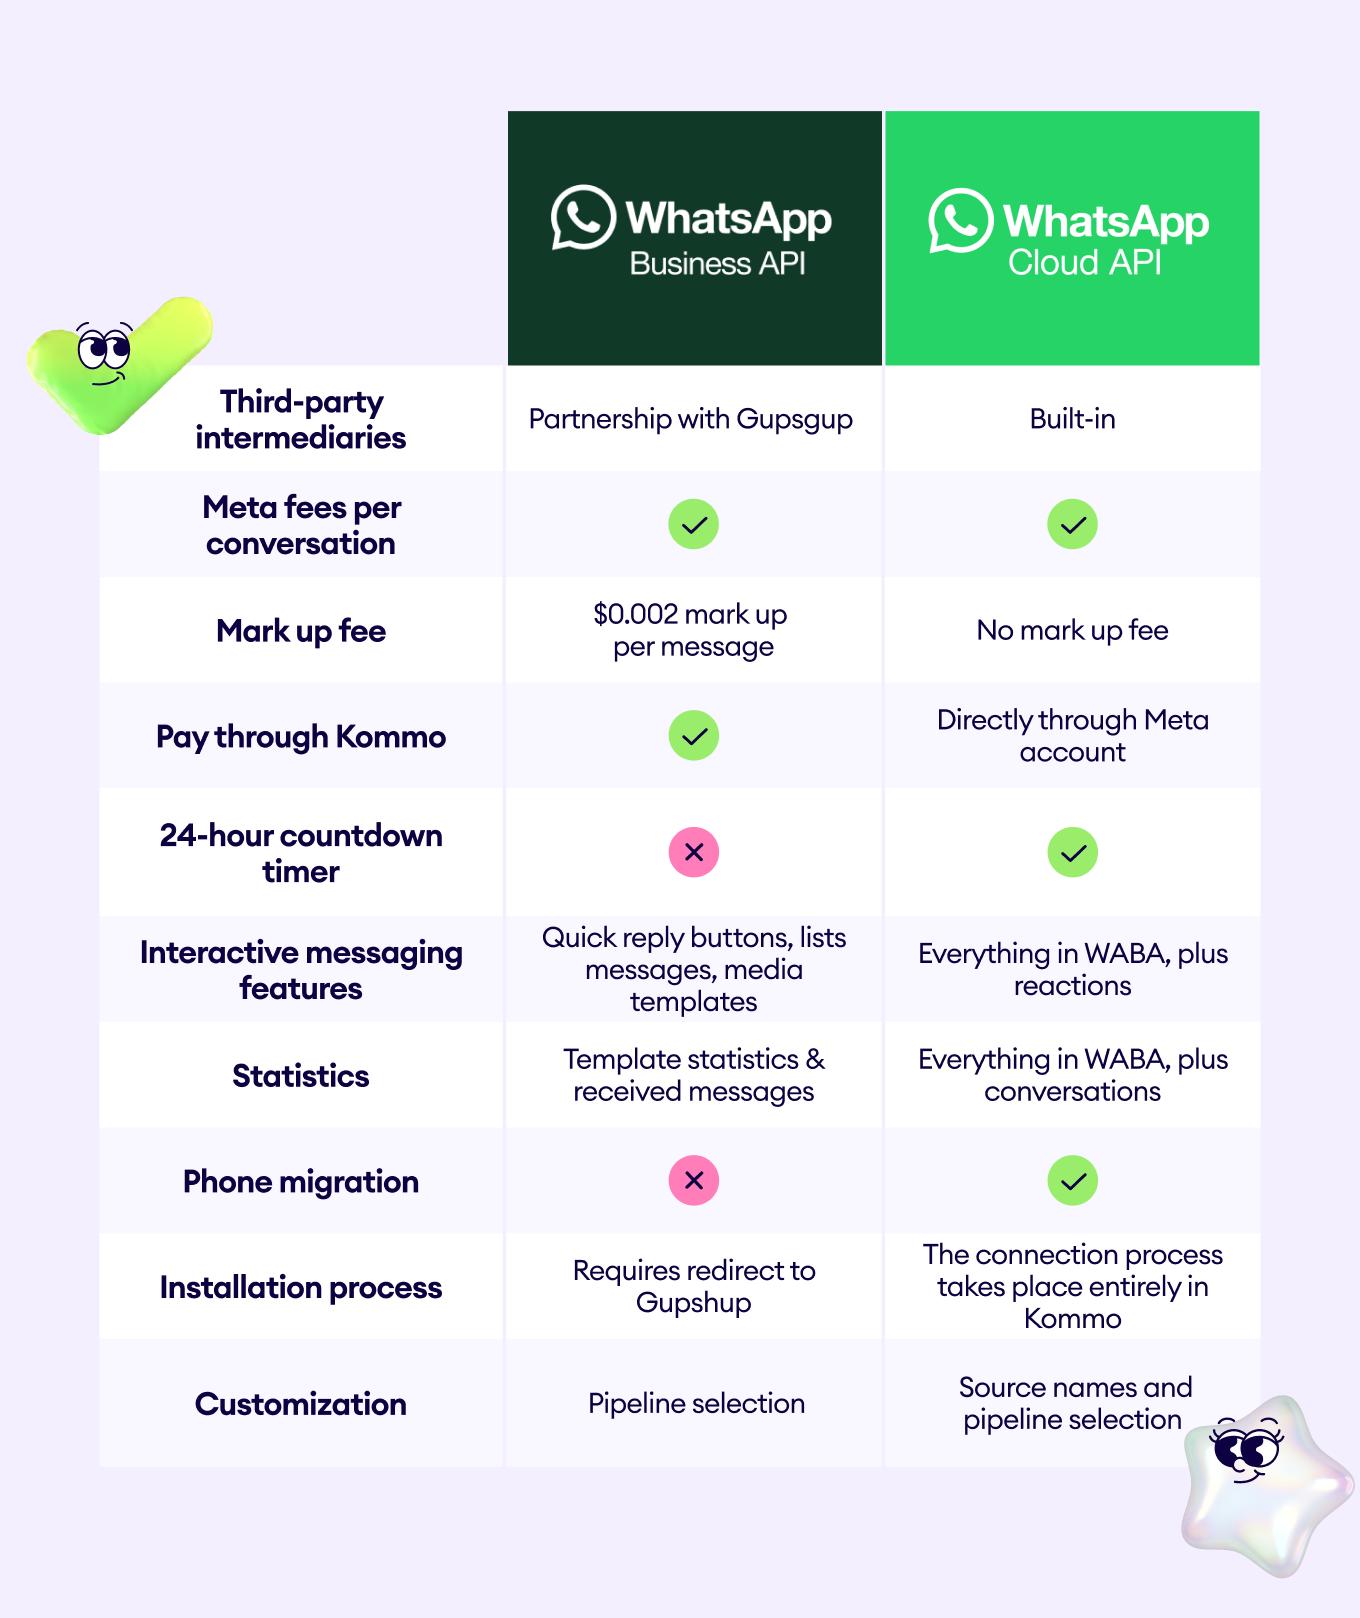
If you are using Kommo’s WhatsApp Business API integration, and you are considering whether to migrate to WhatsApp Cloud API or not, here some factors to consider;
Bottom Line
The WhatsApp Cloud API offers numerous advantages over the On-Premise API, making it an attractive choice for businesses seeking seamless integration, cost savings, automatic updates, and increased messaging capacity.
Businesses can leverage the Cloud API to improve communication and customer engagement with easy setup, instant approval, and less fees.
Add Kommo to the equation, and you'll get an ultimate weapon to maximize the potential of the WhatsApp Cloud API and achieve exceptional customer interactions.
🤓 Book a free demo session
👩💻 Login to your Kommo account
💬 Chat with us here on the website or within your account
🤝 Find a partner to do it for you so that you can relax
🎥 Visit our YouTube Channel


